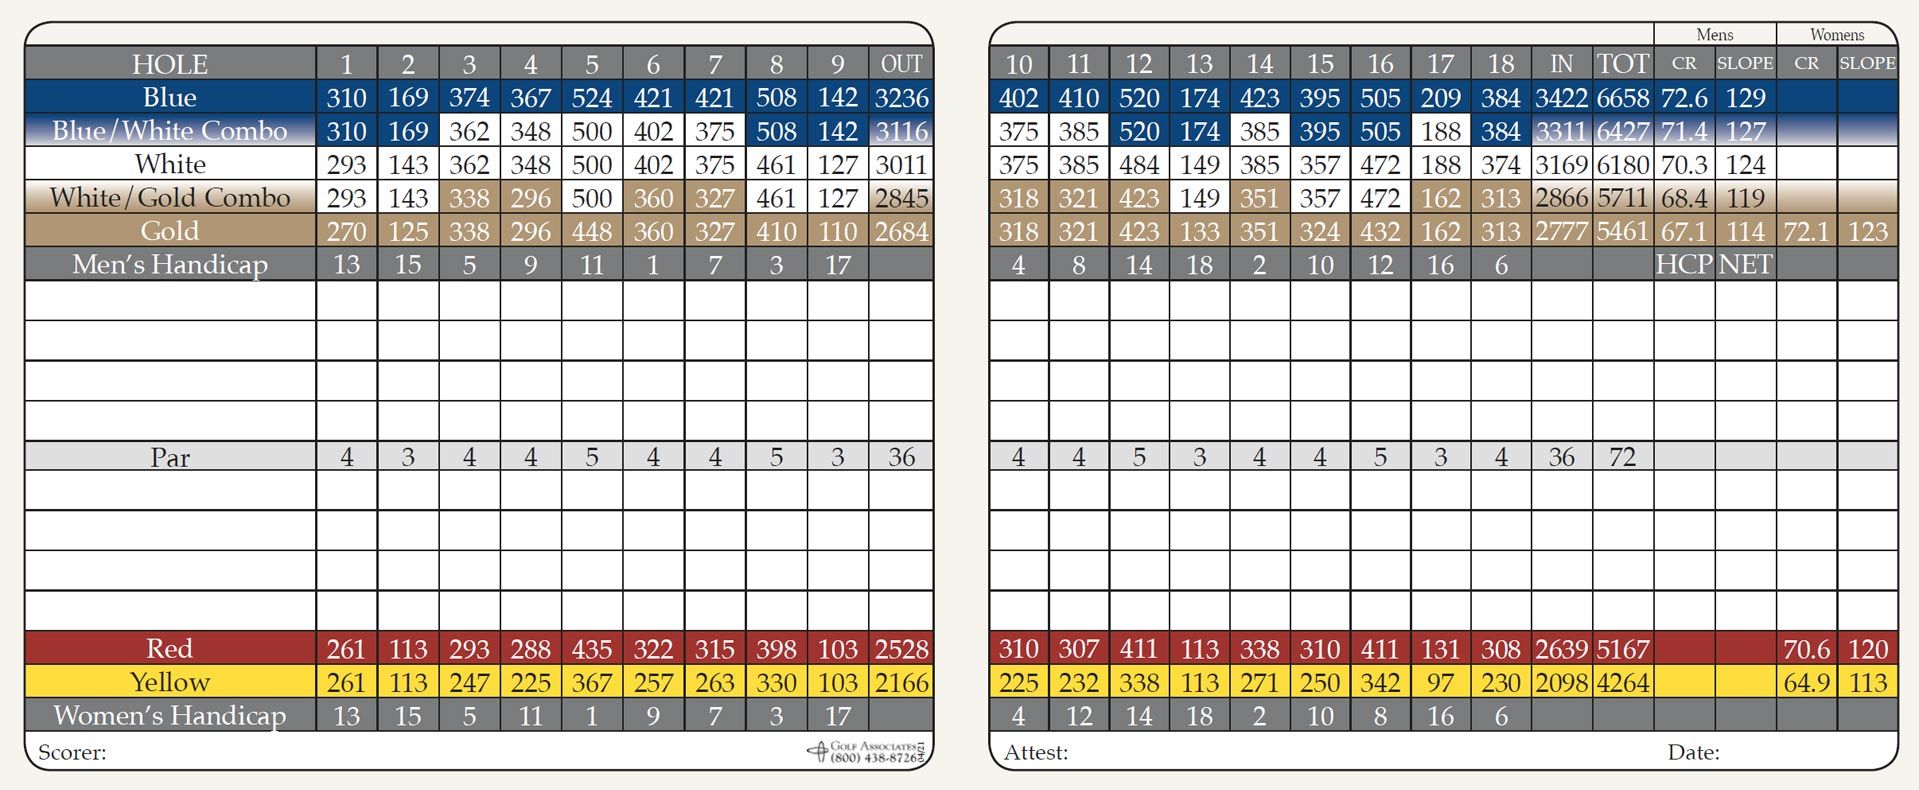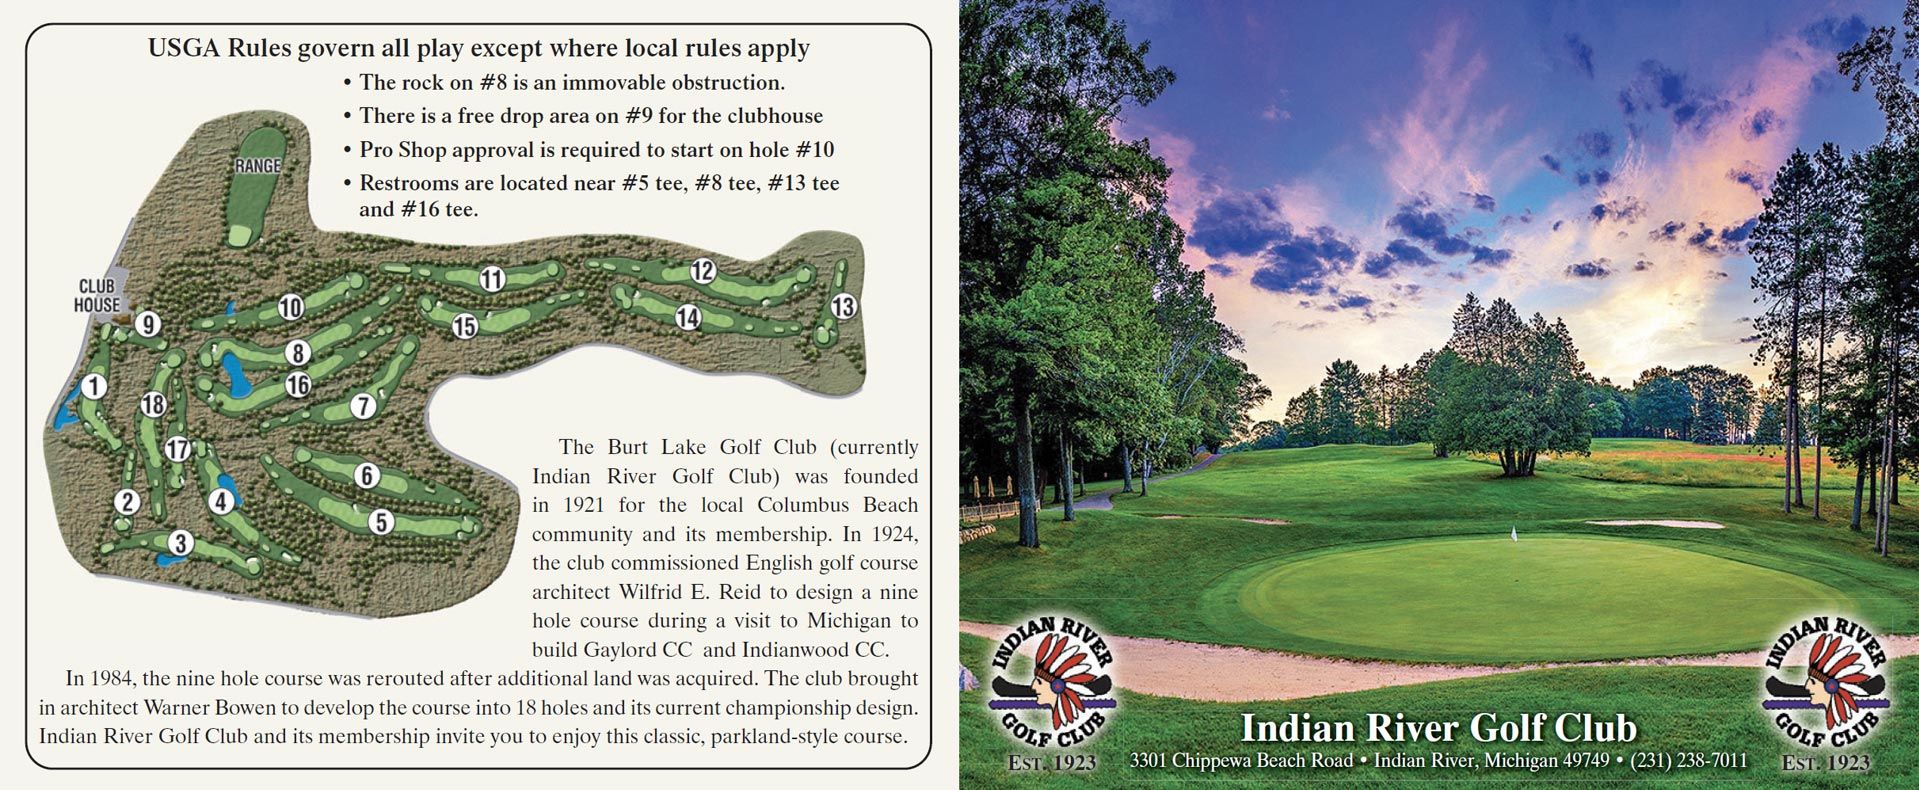


Scorecard & Hole Descriptions


Hole Descriptions
Hole 1 - Par 4, Handicap 13
The opening hole is a 90° dog leg to the left uphill. Play your tee shot toward the 100 yard marker. Water guards the fairway on the right, with trees and bunkers guarding against the use of the driver by long hitters to reach the green. Pay close attention to the pin placement on this two tiered green.
Hole 2 - Par 3, Handicap 15
The narrow green on this slightly downhill par three is guarded by two bunkers in front. The green tilts back-to-front.
Hole 3 - Par 4, Handicap 5
This is a slight dogleg right. Water frames the right side of the fairway and strategically placed cedar trees may interfere with the second shot. Prime position is to the left side of the fairway for your approach shot. Anything over the green may pose problems on this back-to-front right sloping green.
Hole 4 - Par 4, Handicap 9 for Blue/White/Gold tees; Handicap 11 for Red/Yellow Tees
This hole is a dog leg right with water protecting the corner. Long hitters can cut as much of the corner as they dare. Avoid going long off the tee into the native area straight out. Club selection is critical for the second shot to this severely two tiered green.
Hole 5 - Par 5, Handicap 11 for Blue/White/Gold tees; Handicap 1 for Red/Yellow tees
This tree lined hole gently curves to the left with a sizable landing area to the right of the fairway bunker. Most players lay up to about 150 to 100 yards as the hole narrows between two bunkers, protecting the green that slopes left-to-right.
Hole 6 - Par 4, Handicap 1 for Blue/White/Gold tees; Handicap 9 for Red/Yellow tees
This is a straight away hole demanding initial shots to be long and straight. Avoid the fairway bunker on the left. Gentle mounds around the green can sometimes deflect errant shots for the better.
Hole 7 - Par 4, Handicap 7
This dog leg left places a premium on a good tee shot. Tee shots to the right will leave a long second shot, while an aggressive shot around the corner to the left sets up a shorter approach with a better view of the green.
Hole 8 - Par 5, Handicap 3
The tee shot on this par 5 is through a generous chute of trees bordering both sides of the fairway, with a slight rise preventing view of a pond. This pond is about 100 yards short of the green and requires most players to lay up. Longer players can go for the green in two. The large, elevated green requires an approach shot to the proper quadrant while avoiding the bunker on the right.
Hole 9 - Par 3, Handicap 17
This short, severely downhill hole places a premium on distance control with a large bunker behind the green and bunkers to the left and right.
Hole 10 - Par 4, Handicap 4
This slight dogleg to the left requires a precise tee shot to avoid the trees on both left and right sides of the fairway. Second shot is uphill to a left-to-right sloping green protected by bunkers.
Hole 11 - Par 4, Handicap 8 for Blue/White/Gold tees; Handicap 12 for Red/Yellow tees
This hole is a slight dogleg left uphill through a tree lined fairway. The right side of the fairway opens the approach to this elevated green. This hole plays toughest when the pin is back right.
Hole 12 - Par 5, Handicap 14
This hole offers a generous landing area left of the mound on the right side of the fairway. A well placed second shot will leave a short iron approach to this front-to-back sloping green that offers good birdie opportunities.
Hole 13 - Par 3, Handicap 18
Avoid the two front bunkers on this slightly up hill par 3. This green slopes front-to-back and left-to-right, and is often three putted.
Hole 14 - Par 4, Handicap 2
This scenic hole begins from an elevated tee to a wide fairway. It features one of the largest two tiered greens on the course. If the pin is left, hit the drive down the right side. If the pin is right, hit the drive down the left side of the fairway for best angle.
Hole 15 - Par 4, Handicap 10
On this short, tree lined dogleg right, beware of the bunker to the right of the landing area. Subsequent shot(s) play to an elevated green protected by two greenside bunkers. Shots short of the green will collect in a chipping area below the green.
Hole 16 - Par 5, Handicap 12 for Blue/White/Gold tees; Handicap 8 for Red/Yellow tees
Tee shots to the left side of the fairway provide an opportunity to go for the green in two by long hitters. Otherwise, layup short of the pond with an iron to the back-to-front sloping green. A slight rise around 150 yards out blocks the view of the pond for layup shots. Short hitters may want to go around the pond.
Hole 17 - Par 3, Handicap 16
This hole requires good distance control to a domed green that often repels shots to the chipping areas both front and right. The deep bunker to left should be avoided.
Hole 18 - Par 4 Handicap 6
This hole requires a straight, uphill tee shot to the left side of the fairway to have an open approach to the green and avoid the tree that fronts the right side of the green. Take an extra club for your second shot. The large green is one of the hardest to read on this great finishing hole at IRGC.
Looking for a Tee Time?
Call us at (231) 238-7011 or Book Online 24/7.


